Building a Pond (or how not to!)Rab Dingwall | |
If you have read recent newsletters you will know that I have a large hole at the bottom of my garden that my son kindly dug for me and called it my new pond. Well some progress has been made and I am putting together a few photos of the development so that others can learn from my mistakes. | |
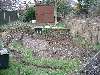 |
The Hole! It is very useful to have a hole but not always strictly necessary. You could build the pond entirely above ground level. It is also very handy if someone else does the digging BUT under your supervision. Unfortunately my hole was dug without consulting me and so is not the shape I'd have preferred and is too close to the boundary wall - which is now in danger of collapsing. |
 |
Walling - Part 1 Having accepted the location and shape we have now dug a little deeper and shaped our levels and planting shelves. We have also built a retaining wall which will later be backfilled to support the boundary wall and to provide an area for terrestial plants behind the pond. |
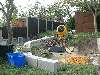 |
Walling - Part 2 The pond is to be semi-raised in that it will be level with the back part of the garden - where the shed is and above ground on the lower lawn (honest it was once a lawn). Note the cement mixer - it is an essential tool. There is no way we could have mixed mortar fast enough manually to do this walling in just two (very easy) days without breaking our backs in the process |
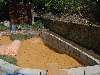 |
Underlay - Part 1 We will be using a liner so to guard against any stones in the earth that may work their way to the surface half a ton of sand is spread over the base about 3" deep |
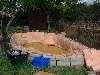 |
Underlay - Part 2 We were going to use old carpets to cover the rough block walling but didn't have enough so we thought we'd try loft insulation which seems to work very well, moulding itself to the shape of the walls and the planting shelves we left. I suspect that it would have done just as well on the base instead of sand |
 |
Fitting the liner - Part 1 Next comes the liner. We used a reinforced PVC which is not as stretchable as butyl but is cheaper and still has a 30 year guarantee. Drape it over the pond ensuring that you have enough overlap on all sides. Once there is more than an inch or two of water in it you won't be able to shift it. |
 |
Fitting the liner - Part 2 Willing helpers immune to the cold are very useful in removing wrinkles and getting the folds that are needed in the right places (where they are least obvious) |
 |
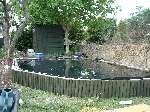
Filling Hours later (Eight and a half in this case) the pond is nearly full and having got bored waiting we have set up the pump that will eventually feed the filter and waterfall. We'll leave it running to help dissipate the chlorine. The pond is 20 feet by 10 feet and 3 foot 6 inches at the deepest point though a large part is just 18" deep. It holds about 2000 gallons |
 |
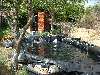
Edging Our walls are all about the right level for the finishing we have in mind - which has still to be delivered. While we wait we have trimmed the liner and faced the raised wall with wood. We have also repainted the shed so that it is less distracting. The filtration has yet to be set up but we should start planting this weekend. More next month |
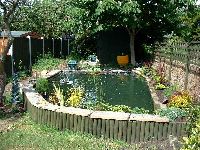 |
Almost Complete We still have not cemented the coping stones to the wall or finished the side that backs onto the shed but we have planted out the rear bed and installed a few marginals and lilies. Once the waterfall arrives and is sited we can move the filter box and finish the edging and do the landscaping in front of the shed. Other than that the pond is done and is home to a few small goldfish - until it settles and matures |